Proxmox의 VM 및 LXC등을 Terraform/Opentofu로 관리하여 선언적으로 홈랩 인프라를
관리할 수 있다.
여기서는
bpg/proxmox(opentofu버전은 여기)
Provider를 이용한다.
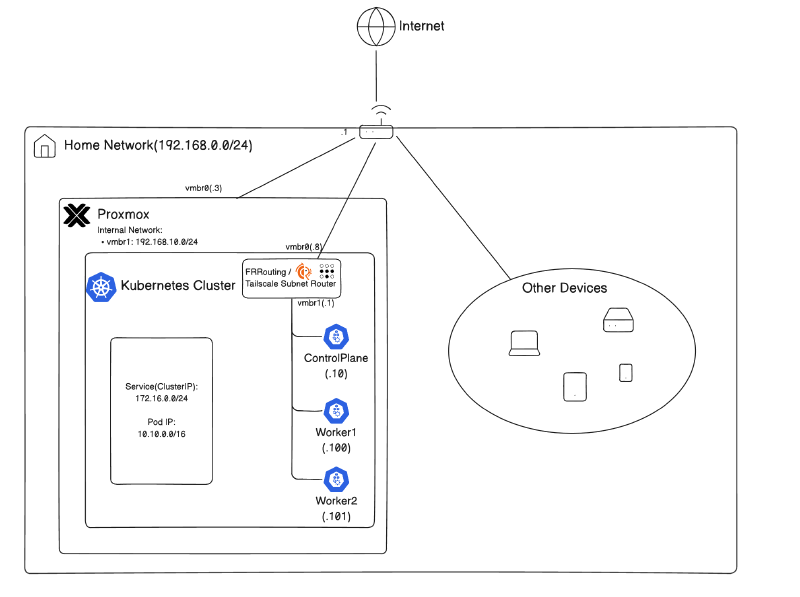
아래의 네트워크 토폴로지를 구성할 것이다: 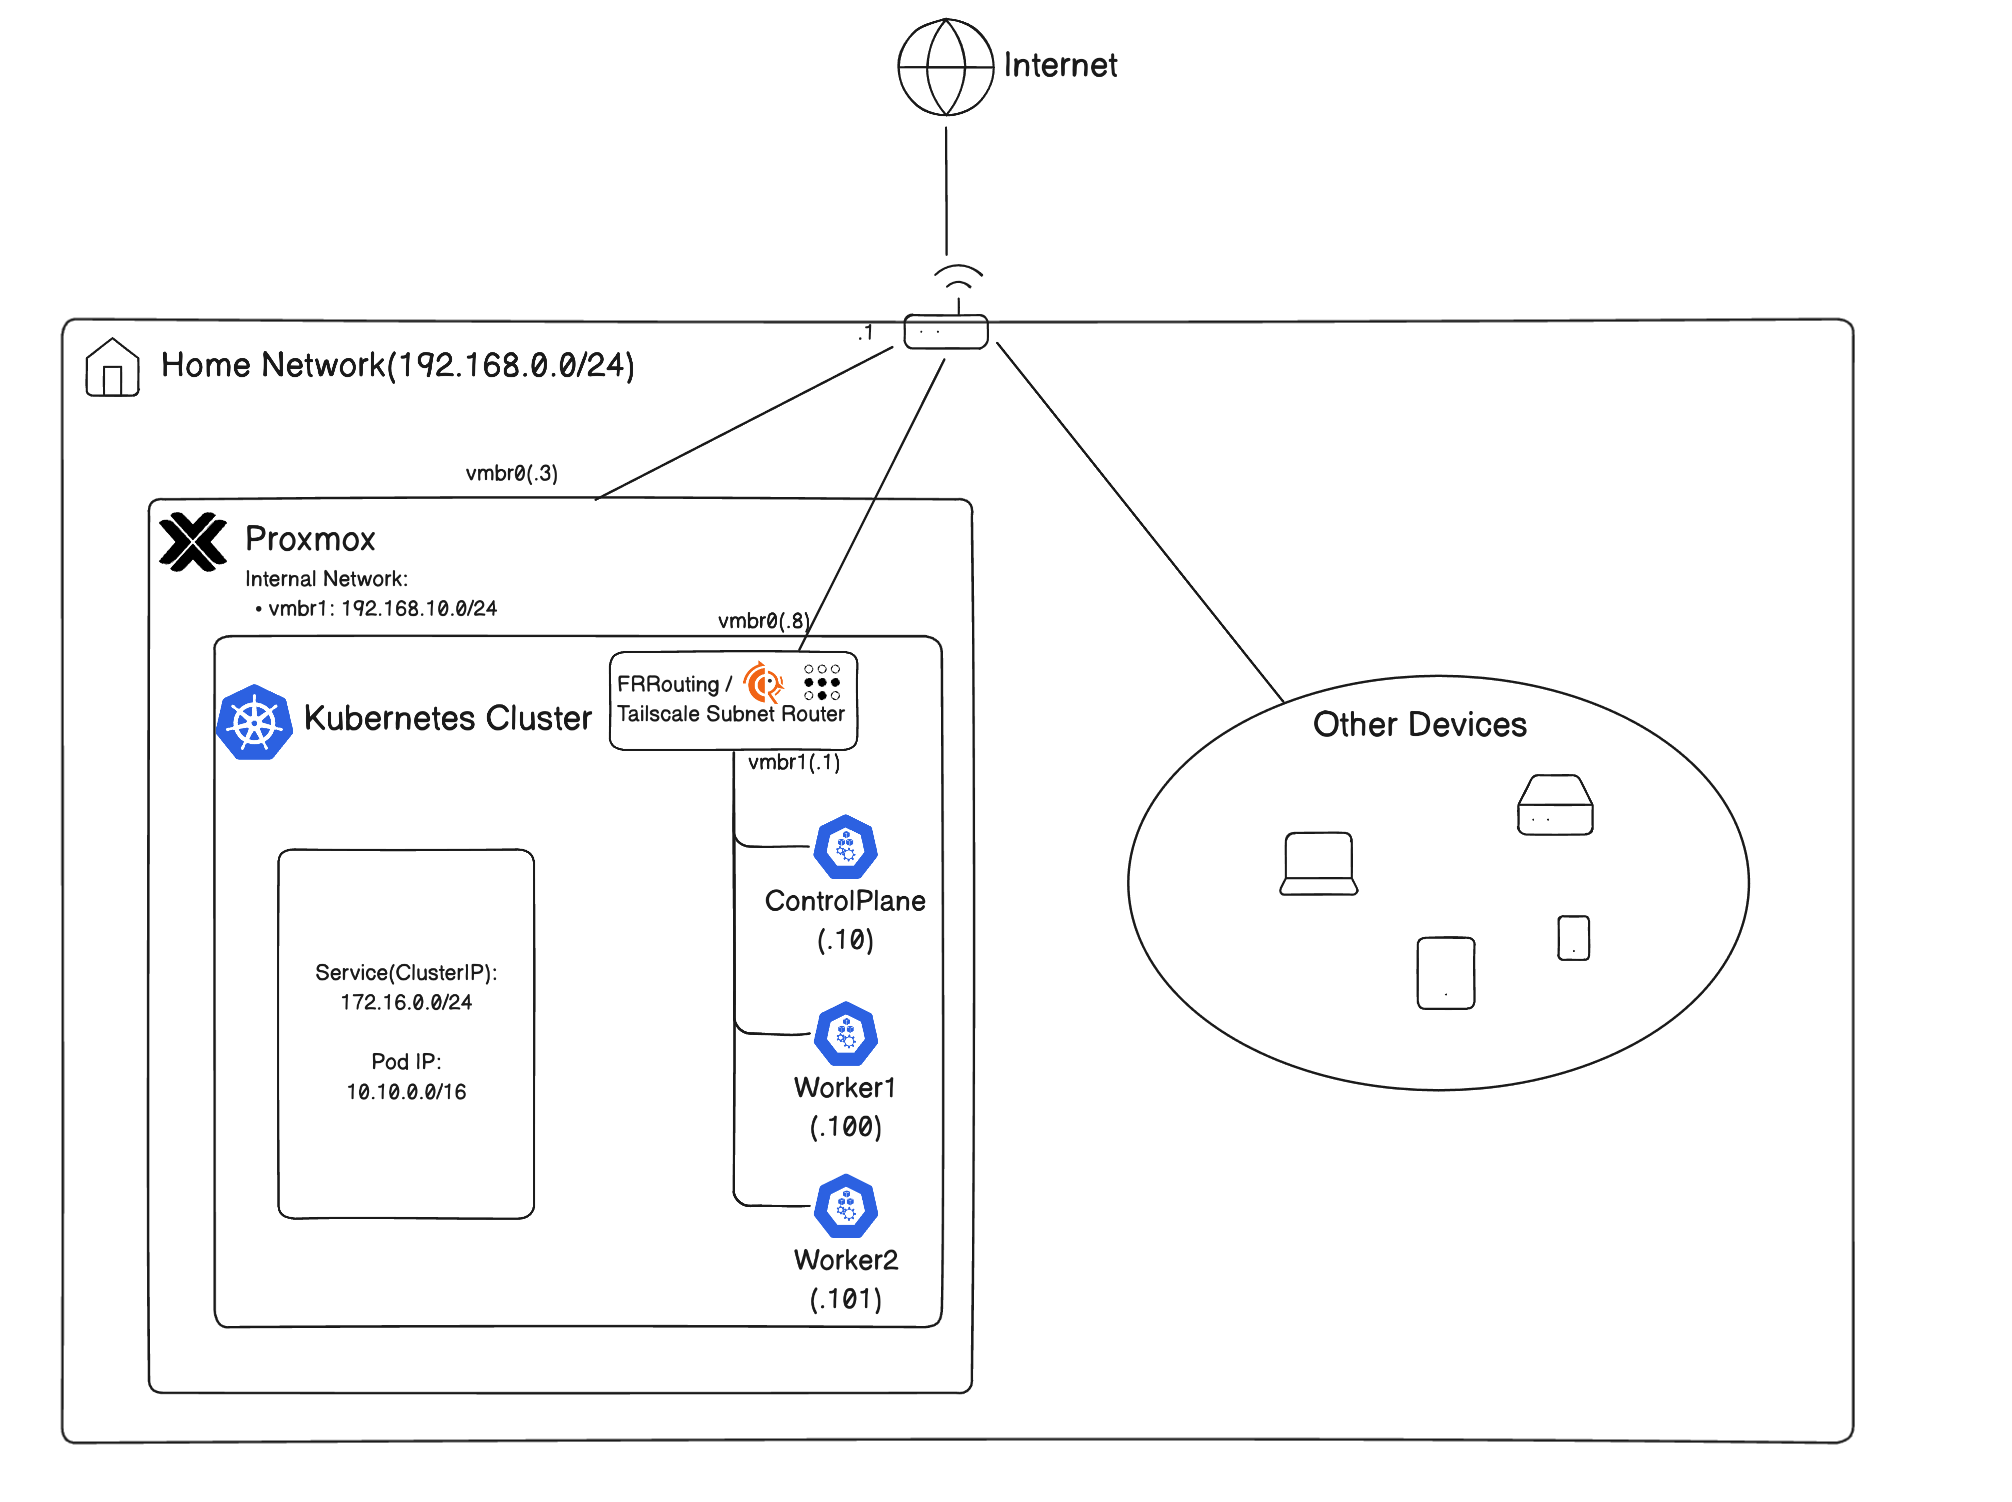
계정 생성
Terraform 사용을 위한 최소 권한의 계정을 만들어줄 것이다.
Proxmox 9에서는 아래의 명령을 쓰면 된다:
1
2
3
|
pveum role add TerraformProv -privs "Datastore.AllocateSpace Datastore.AllocateTemplate Datastore.Audit Pool.Allocate Pool.Audit Sys.Audit Sys.Console Sys.Modify VM.Allocate VM.Audit VM.Clone VM.Config.CDROM VM.Config.Cloudinit VM.Config.CPU VM.Config.Disk VM.Config.HWType VM.Config.Memory VM.Config.Network VM.Config.Options VM.Migrate VM.PowerMgmt SDN.Use VM.GuestAgent.Audit"
pveum user add terraform-prov@pve --password <password>
pveum aclmod / -user terraform-prov@pve -role TerraformProv
|
각 줄마다 다음과 같다:
- terraform user를 위한 role생성(vm생성, 네트워크 관리 등을 위한 최소 권한)
- 사용자 생성
- user에게 role을 바인딩
토큰 생성
비밀번호 대신 API 토큰을 사용하는 것이 권장된다.
1
|
pveum user token add terraform-prov@pve mytoken
|
이 명령은 terraform-prov@pve에게 mytoken이라는 id의 토큰을 만든다.
나온 값을 안전한 곳에 저장해주자.
기본적으로, token이 user의 권한을 다 계승받는 것이 아니다.
Privilege Separation이 되어있다.
그래서, role을 별도로 바인딩해줘야 한다.
1
|
pveum aclmod / -token 'terraform-prov@pve!mytoken' -role TerraformProv
|
🫥 .gitignore
.gitignore에 다음 파일들을 넣어주자
1
2
3
4
5
|
.terraform/
.DS_Store
*.tfstate
*.tfstate.backup
*tfvars
|
📂 폴더 구조
현재는 terragrunt나 s3 remote backend를 세팅하지 않았다.
당장은 부분마다 불편하더라도 폴더별로 init -> plan -> apply를 하는식으로 단순하게 사용한다.
때문에, provider.tf나 variables.tf등에서 반복적인 작업의 부분이 생길 수 있다.
 1
 2
 3
 4
 5
 6
 7
 8
 9
10
11
12
13
14
15
16
17
18
19
20
21
22
23
24
25
26
27
28
29
30
31
32
33
34
35
36
37
38
39
40
41
42
|
.
├── 00.network
│   ├── main.tf
│   ├── provider.tf
│   ├── terraform.tfstate
│   ├── terraform.tfvars
│   └── variables.tf
├── 01.templates
│   ├── main.tf
│   ├── outputs.tf
│   ├── provider.tf
│   ├── terraform.tfstate
│   ├── terraform.tfvars
│   └── variables.tf
├── 10.routers
│   ├── main.tf
│   ├── outputs.tf
│   ├── provider.tf
│   ├── terraform.tfstate
│   ├── terraform.tfvars
│   └── variables.tf
├── 11.nodes
│   ├── main.tf
│   ├── outputs.tf
│   ├── provider.tf
│   ├── terraform.tfstate
│   ├── terraform.tfvars
│   └── variables.tf
├── 98.cloud-init
│   ├── frr-cloud-config.yaml
│   └── general-vm-config.yaml
├── 99.modules
│   ├── template
│   │   ├── main.tf
│   │   ├── outputs.tf
│   │   ├── provider.tf
│   │   └── variable.tf
│   └── vm
│       ├── main.tf
│       ├── outputs.tf
│       ├── provider.tf
│       └── variable.tf
|
📦 Provider 설정
각 세부폴더별 provider를 다음과 같이 세팅한다:
SSH 에이전트 세팅
ssh키가 없다면, 생성한다.
사용하려는 Opentofu Provider가 파일을 조작할 때, SSH Agent를 이용하기에, SSH
키를 배포해야 한다.
1
2
3
4
5
6
7
8
9
|
# SSH Agent 실행
eval $(ssh-agent -s)

# SSH Agent에게 키 목록 추가
ssh-add ~/.ssh/id_rsa
ssh-add ~/.ssh/id_ed25519

# 노드에 키 전달
ssh-copy-id root@<proxmox-node>
|
provider.tf
provider.tf에 아래 내용을 추가한다.
 1
 2
 3
 4
 5
 6
 7
 8
 9
10
11
12
13
14
15
16
17
18
19
|
terraform {
  required_providers {
    proxmox = {
      source  = "bpg/proxmox"
      version = "0.93.0"
    }
  }
}

provider "proxmox" {
  endpoint  = "https://<proxmox-node>:8006"
  api_token = var.proxmox_api_token
  insecure  = true

  ssh {
    agent    = true
    username = "root"
  }
}
|
variable.tf에 proxmox_api_token값을 저장한다.
1
2
3
|
variable "proxmox_api_token" {
  type = string
}
|
이후, provider를 세팅해준다.
🧱 모듈
테라폼 코드의 재사용성을 위해, 모듈화를 진행해주었다.
여기서는 두 가지의 핵심 모듈이 있다:
- 탬플릿 모듈 - 클라우드 이미지를 참조하여 proxmox에서 template vm으로 기초적인 뼈대를 생성하는 모듈
- vm모듈 - 탬플릿을 참조하여 vm을 생성한 뒤, cloud-init을 이용하여 세부 설정
보통 Proxmox에서 vm을 생성하는 패턴은 다음과 같다:
- 클라우드 이미지로부터 기본 세팅된 탬플릿 vm생성
- 탬플릿 vm으로부터 클론
- cloud-init으로 개별화
이를 통해서 다음의 이점을 가진다:
참고로, 모듈의 provider.tf에는 provider "proxmox"{} 부분이 없어도 된다.
모듈에서는 자격 증명을 요구하지 않기 때문이다.
탬플릿 모듈
탬플릿 모듈은 클라우드 이미지를 설치하여 최소한의 기본 설정을 할당한다.
provider.tf는 생략.
변수 정의
 1
 2
 3
 4
 5
 6
 7
 8
 9
10
11
12
13
14
15
16
17
18
19
20
21
|
# 99.modules/template/variable.tf
variable "template_id" {
  type = number
}

variable "template_name" {
  type = string
}

variable "ve_node_name" {
  type = string
}

variable "datastore_id" {
  type    = string
  default = "local"
}

variable "image_url" {
	type = string
}
|
입력받을 변수를 정의한다.
template_id: 탬플릿 vm의 idtemplate_name: 탬플릿 vm의 이름ve_node_name: 생성될 Proxmox 노드datastore_id: 가상디스크를 할당할 스토리지명image_url: 클라우드 이미지를 설치할 수 있는 URL
main.tf
template vm의 이름과 어느 노드에서 띄울지, id등을 정한다.
그리고, 기본적인 cpu코어 수, 메모리, 디스크 설정 등을 해준다.
핵심은 template=true로 지정했으며, 클라우드 이미지를 디스크에 설치한다는 것이다.
 1
 2
 3
 4
 5
 6
 7
 8
 9
10
11
12
13
14
15
16
17
18
19
20
21
22
23
24
25
26
27
28
29
30
31
32
33
34
35
36
37
38
39
40
41
42
43
44
45
46
47
48
49
50
51
52
53
54
55
56
57
58
|
# 99.modules/template/main.tf
resource "proxmox_virtual_environment_vm" "template" {
  name      = var.template_name
  node_name = var.ve_node_name
  vm_id     = var.template_id

  template = true # Template
  started  = false

  machine     = "q35"  # modern vm type <-> pc: legacy system
  bios        = "ovmf" # UEFI
  description = "Managed by Terraform"

  cpu {
    cores = 2
  }

  memory {
    dedicated = 2048
  }

  # Required if bios == ovmf
  efi_disk {
    datastore_id = var.datastore_id
    type         = "4m" # Recommended
  }

  disk {
    datastore_id = var.datastore_id
    file_id      = proxmox_virtual_environment_download_file.cloud_image.id # file ID for a disk image
    interface    = "virtio0"
    iothread     = true
    discard      = "on" # pass discard/trim requests to the underlying storage
    size         = 20
  }

  # Cloud_init config
  initialization {
    datastore_id = var.datastore_id
    ip_config {
      ipv4 {
        address = "dhcp"
      }
    }
  }

  network_device {
    bridge = "vmbr0"
  }
}

# Download Cloud image
resource "proxmox_virtual_environment_download_file" "cloud_image" {
  content_type = "iso"
  datastore_id = var.datastore_id
  node_name    = var.ve_node_name
  url          = var.image_url
}
|
outputs.tf
template vm의 id를 다른 생성하려는 vm에서 참조하려면, id가 필요하므로 output으로 별도 저장해준다.
1
2
3
4
|
# 99.modules/template/outputs.tf
output "id" {
  value = proxmox_virtual_environment_vm.template.id
}
|
vm 모듈
이제, vm모듈을 만든다.
vm모듈은 template vm의 id를 참조하여 clone한 뒤, 별도의 cloud-init설정을 주입하도록 할 것이다.
variables.tf
 1
 2
 3
 4
 5
 6
 7
 8
 9
10
11
12
13
14
15
16
17
18
19
20
21
22
23
24
25
26
27
28
29
30
31
32
33
34
35
36
37
38
39
40
41
42
43
44
45
46
47
48
|
# 99.modules/vm/variables.tf
variable "vm_name" {
  type = string
}

variable "node_name" {
  type = string
}

variable "vm_id" {
  type = number
}

variable "template_id" {
  type = string
}

variable "cpu_cores" {
  type = number
}

variable "memory" {
  type = number
}

variable "datastore_id" {
  type = string
}

variable "networks" {
  type = list(object({
    bridge = string
    ip     = string
    gw     = string
  }))
}

variable "ssh_keys" {
  type = list(string)
}

variable "username" {
  type = string
}

variable "cloud_init_data" {
  type = string
}
|
이미 익숙한 변수들이 보인다.
추가적으로, 다음의 변수들이 보인다:
- 참조할
template_id
- 덮어씌울 컴퓨팅 스펙
- 여러 네트워크 링크를 위한 정보
- ssh 키
- 사용자명
- cloud init 데이터
main.tf
 1
 2
 3
 4
 5
 6
 7
 8
 9
10
11
12
13
14
15
16
17
18
19
20
21
22
23
24
25
26
27
28
29
30
31
32
33
34
35
36
37
38
39
40
41
42
43
44
45
46
47
48
49
50
51
52
53
54
55
56
57
|
# 99.modules/vm/main.tf
resource "proxmox_virtual_environment_vm" "vm" {
  name      = var.vm_name
  node_name = var.node_name
  vm_id     = var.vm_id
  clone {
    vm_id = var.template_id
  }

  agent {
    enabled = true
  }

  cpu {
    cores = var.cpu_cores
  }
  memory {
    dedicated = var.memory
  }

  dynamic "network_device" {
    for_each = var.networks
    content {
      bridge = network_device.value.bridge
    }
  }

  initialization {
    datastore_id      = var.datastore_id
    user_data_file_id = proxmox_virtual_environment_file.cloud_config.id
    user_account {
      username = var.username
      keys     = var.ssh_keys
    }

    dynamic "ip_config" {
      for_each = var.networks
      content {
        ipv4 {
          address = ip_config.value.ip
          gateway = ip_config.value.gw != "" ? ip_config.value.gw : null
        }
      }
    }
  }
}

resource "proxmox_virtual_environment_file" "cloud_config" {
  node_name    = var.node_name
  datastore_id = var.datastore_id
  content_type = "snippets"

  source_raw {
    data      = var.cloud_init_data
    file_name = "${var.vm_name}.cloud-config.yaml"
  }
}
|
Proxmox는 기본적으로 Shutdown, Reboot등을 ACPI로 제어하여, VM안에서 qemu-guest-agent가 필요하지 않다.
그러나, 간혹 통하지 않는 VM이 있다고 한다.
이러면 destroy시 무한로딩이 걸릴 수 있다.
그래서, qemu-guest-agent를 활성화시키는 것을 보장하기로 약속하는 플래그로 agent.enabled = true를 설정한다.
단, qemu-guest-agent가 설치되어야 하는데, 대부분의 클라우드 이미지에는 없을 것이다.
그래서, cloud-init을 통해 qemu-geust-agent를 설치해줘야 한다.
이 vm은 template vm으로부터 vm을 클론하고, 입력받은 스펙대로 새로 오버라이드하며, cloud-init을 이식해준다.
cloud-init데이터 또한 변수처리하여 유연하게 받을 수 있도록 세팅해줬다.
outputs.tf
출력 결과 표시를 위해, output으로 ip주소를 넣어주었다.
1
2
3
4
|
# 99.modules/vm/outputs.tf
output "ips" {
  value = proxmox_virtual_environment_vm.vm.ipv4_addresses
}
|
🌐 내부 네트워크 생성
vmbr1이라는 가상 네트워크 인터페이스를 만들어준다.
proxmox 내부 네트워크를 위해 만들어줬다.
1
2
3
4
5
6
|
# 00.network/main.tf
resource "proxmox_virtual_environment_network_linux_bridge" "vmbr1" {
  node_name = "pve-01"
  name      = "vmbr1"
  comment = "In-proxmox network"
}
|
이후, 적용해준다.
대시보드에서 vmbr1이 생긴 것을 확인할 수 있다.
🐣 탬플릿 생성
이제, 모듈을 참조해서 자원을 만들어보자.
Ubuntu 24.04 LTS 클라우드 이미지를 기반으로 탬플릿을 생성해준다.
1
2
3
4
5
6
7
8
9
|
# 01.templates/main.tf
module "ubuntu_template" {
  source        = "../99.modules/template"
  template_id   = 100
  template_name = "ubuntu-template"
  ve_node_name  = "pve-01"
  datastore_id  = "local"
  image_url     = "https://cloud-images.ubuntu.com/noble/20251113/noble-server-cloudimg-amd64.img"
}
|
outputs.tf로 id를 참조할 수 있도록 출력해준다.
1
2
3
4
|
# 01.templates/outputs.tf
output "id" {
    value = module.ubuntu_template.id
}
|
적용해주면, Ubuntu 24.04를 기반으로 한 탬플릿 vm이 생성된다.
↔️ 라우터 vm 생성
라우터 역할을 할 vm을 생성해준다.
이 vm에서는 FRRouting BGP + NAT + Tailscale Subnet Router를 제공해줄 것이다.
 1
 2
 3
 4
 5
 6
 7
 8
 9
10
11
12
13
14
15
16
17
18
19
20
21
22
23
24
25
26
27
28
29
30
31
32
33
34
35
36
37
38
39
|
# 10.routers/main.tf
locals {
  # 공개 키를 여기에 넣기
  ssh_keys = [
	  ...
  ]

  vm_name  = "frr-router"
  username = "ubuntu"
}

data "terraform_remote_state" "ubuntu_template" {
  backend = "local"
  config = {
    path = "../01.templates/terraform.tfstate"
  }
}

module "frrouter" {
  source       = "../99.modules/vm"
  node_name    = "pve-01"
  vm_name      = local.vm_name
  vm_id        = 200
  template_id  = data.terraform_remote_state.ubuntu_template.outputs.id
  cpu_cores    = 2
  memory       = 2048
  username     = local.username
  datastore_id = "local"
  networks = [
    { bridge = "vmbr0", ip = "192.168.0.8/24", gw = "192.168.0.1" },
    { bridge = "vmbr1", ip = "192.168.10.1/24", gw = "" }
  ]
  ssh_keys = local.ssh_keys
  cloud_init_data = templatefile("${path.root}/../98.cloud-init/frr-cloud-config.yaml", {
    hostname = local.vm_name
    username = local.username
    ssh_keys = local.ssh_keys
  })
}
|
Ubuntu template으로부터 clone시키고, 별도의 cloud-init을 주입하여 NAT셋업을
해준다.
SSH 키도 같이 주입해준다.
Cloud-init
qemu-guest-agent와 기타 필수 프로그램을 설치한다.
이후, 패킷을 포워딩하도록 커널 모듈을 활성화해주고, iptables의 포워딩 규칙도
추가하여 proxmox 내부 네트워크에서 외부로 NAT가 가능하도록 정책을
적용해준다.
 1
 2
 3
 4
 5
 6
 7
 8
 9
10
11
12
13
14
15
16
17
18
19
20
21
22
23
24
25
26
27
28
29
30
31
|
# 98.frr-cloud-config.yaml
#cloud-config
hostname: ${hostname}
manage_etc_hosts: true
user: ${username}
ssh_authorized_keys:
%{ for key in ssh_keys ~}
  - ${key}
%{ endfor ~}

packages:
  - qemu-guest-agent
  - curl
  - vim
  - iptables-persistent

runcmd:
  - apt update
  - apt upgrade -y
  - systemctl enable --now qemu-guest-agent
  - cat << EOF | tee /etc/sysctl.d/99-forward.conf
    net.ipv4.ip_forward = 1
    net.ipv6.conf.all.forwarding = 1
    EOF
  - sysctl --system
  - iptables -t nat -A POSTROUTING -o eth0 -j MASQUERADE
  - iptables -A FORWARD -i eth1 -o eth0 -j ACCEPT
  - iptables -A FORWARD -i eth0 -o eth1 -m state --state RELATED,ESTABLISHED -j ACCEPT
  - netfilter-persistent save

  - echo "Cloud-init finished at $(date)" > /var/log/cloud-init-done.log
|
outputs.tf
IP를 조회할 수 있도록 output을 만들어준다.
쿠버네티스 노드들이 기본 게이트웨이를 참조할 때도 필요하다.
1
2
3
4
|
# 10.routers/outputs.tf
output "frr_ip" {
  value = module.frrouter.ips
}
|
적용
적용 시, 라우터 vm이 생성되고, 두 개의 네트워크 인터페이스로 공유기의 네트워크와
proxmox클러스터 내부 네트워크에 둘다 연결된다.
🐥 k8s노드 vm 생성
이제, 쿠버네티스 노드들을 위한 vm들을 생성해준다.
반복문을 이용해서 값만 변경하여 여러 개 생성한다.
template vm의 id와 라우터의 내부망 ip를 remote_state로 참조해온다.
그뒤, 3개의 노드를 생성한다.
기본 게이트웨이로 앞에서 만든 라우터로 트래픽이 향하도록 만든 것을 알 수 있다.
 1
 2
 3
 4
 5
 6
 7
 8
 9
10
11
12
13
14
15
16
17
18
19
20
21
22
23
24
25
26
27
28
29
30
31
32
33
34
35
36
37
38
39
40
41
42
43
44
45
46
47
48
49
50
51
52
53
54
55
56
57
58
59
60
61
62
63
64
65
66
67
68
69
70
71
72
73
|
# 11.nodes/main.tf
data "terraform_remote_state" "ubuntu_template" {
  backend = "local"
  config = {
    path = "../01.templates/terraform.tfstate"
  }
}
data "terraform_remote_state" "frr" {
  backend = "local"
  config = {
    path = "../10.routers/terraform.tfstate"
  }
}

locals {
  # 공개 키를 여기에 넣기
  ssh_keys = [
	  ...
  ]

  ubuntu_template_id = data.terraform_remote_state.ubuntu_template.outputs.id
  frroute_ip         = data.terraform_remote_state.frr.outputs.frr_ip[2][0]

  k8s_nodes = {
    "cp-1" : {
      vm_name   = "cp-1"
      vm_id     = "1010",
      cpu_cores = 4
      memory    = 4096
      networks = [
        { bridge = "vmbr1", ip = "192.168.10.10/24", gw = local.frroute_ip }
      ]
    }
    "worker-1" : {
      vm_name   = "worker-1"
      vm_id     = "1100",
      cpu_cores = 4
      memory    = 4096
      networks = [
        { bridge = "vmbr1", ip = "192.168.10.100/24", gw = local.frroute_ip }
      ]
    }
    "worker-2" : {
      vm_name   = "worker-2"
      vm_id     = "1101",
      cpu_cores = 4
      memory    = 4096
      networks = [
        { bridge = "vmbr1", ip = "192.168.10.101/24", gw = local.frroute_ip }
      ]
    }
  }
}

module "k8s-node" {
  source       = "../99.modules/vm"
  node_name    = "pve-01"
  for_each     = local.k8s_nodes
  vm_name      = each.value.vm_name
  vm_id        = each.value.vm_id
  template_id  = local.ubuntu_template_id
  cpu_cores    = each.value.cpu_cores
  memory       = each.value.memory
  username     = "ubuntu"
  datastore_id = "local"
  networks     = each.value.networks
  ssh_keys     = local.ssh_keys
  cloud_init_data = templatefile("${path.root}/../98.cloud-init/general-vm-config.yaml", {
    hostname = each.value.vm_name
    username = "ubuntu"
    ssh_keys = local.ssh_keys
  })
}
|
Cloud-init
여기서는 별도의 큰 작업 없이, 일부 필수프로그램만 받아주며 ssh키만 추가한다.
또한, NAT설정을 하도록 커널 모듈 로딩과 방화벽 설정을 해주었다.
 1
 2
 3
 4
 5
 6
 7
 8
 9
10
11
12
13
14
15
16
17
18
19
20
21
22
23
24
25
26
27
28
29
30
31
32
33
34
|
# 98.cloud-init/general-vm-config.yaml
#cloud-config
hostname: ${hostname}
manage_etc_hosts: true
user: ${username}
ssh_authorized_keys:
%{ for key in ssh_keys ~}
  - ${key}
%{ endfor ~}

packages:
  - qemu-guest-agent
  - curl
  - vim
  - iptables-persistent

write_files:
  - path: /etc/sysctl.d/99-forward.conf
    owner: root:root
    permissions: '0644'
    content: |
      net.ipv4.ip_forward = 1
      net.ipv6.conf.all.forwarding = 1

runcmd:
  - apt update
  - apt upgrade -y
  - systemctl enable --now qemu-guest-agent
  - sysctl --system
  - iptables -t nat -A POSTROUTING -o eth0 -j MASQUERADE
  - iptables -A FORWARD -i eth1 -o eth0 -j ACCEPT
  - iptables -A FORWARD -i eth0 -o eth1 -m state --state RELATED,ESTABLISHED -j ACCEPT
  - netfilter-persistent save
  - echo "Cloud-init finished at $(date)" > /var/log/cloud-init-done.log
|
outputs.tf
IP를 조회할 수 있도록 outputs를 사용한다.
1
2
3
4
5
6
|
output "k8s_node_ips" {
  value = {
    for k, ip in module.k8s-node :
    k => ip.ips
  }
}
|
노드가 여럿이므로 반복문을 이용한다.
적용
적용 시, 3개의 노드가 생성된다.
🔐 Tailscale 설치
Tailscale은 Wireguard기반의 VPN을 지원해주는 서비스이다.
이를 이용해서 Proxmox 클러스터 내부의 vm들에 접근할 수 있도록 해줄 것이다.
그러나, 각각의 VM이 tailnet VPN에 가입되는것은 번거롭기에, Subnet Router 기능을
이용해서 라우터 VM에만 VPN을 가입시키고, 트래픽을 중개시켜줄 것이다.
Router에 Tailscale설치
bastion host(FRRouter)에 접속해서 Tailscale을 설치해준다.
1
2
3
4
5
|
ssh bastion

curl -fsSL https://tailscale.com/install.sh | sh

sudo tailscale up
|
Subnet router 기능 이용하기
공식 문서에
따르면, 원래는 패킷 포워딩설정을 먼저 해줘야 하지만, 우리는 이미 cloud-init에서
했기에 건너뛴다.
광고할 서브넷을 세팅해준다.
192.168.10.0/24 - Kubernetes Nodes172.20.0.0/24 - LoadBalancer VIPs
1
|
sudo tailscale set --advertise-routes="192.168.10.0/24,172.20.0.0/24"
|
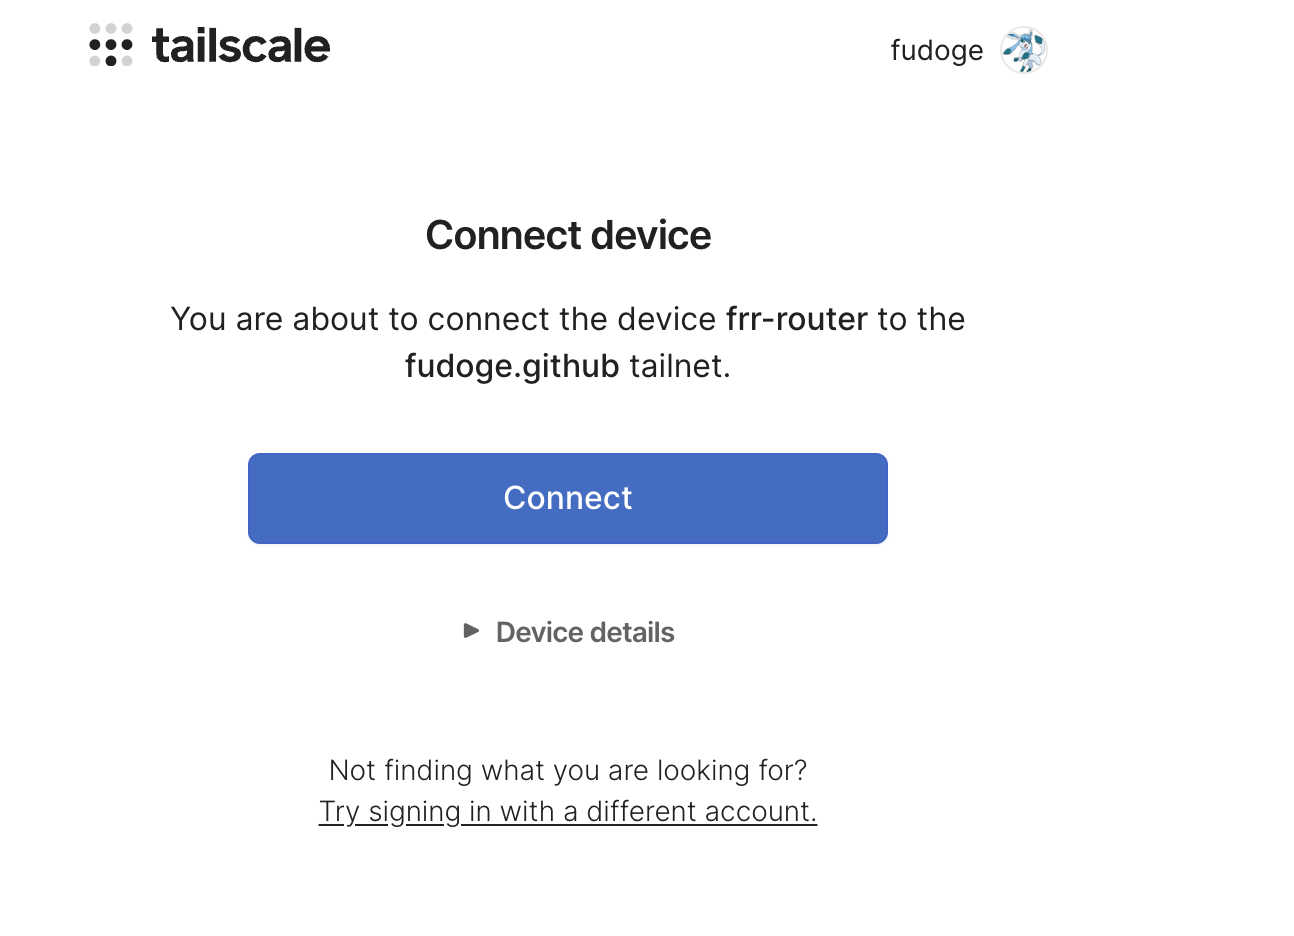
이후, Admin Console에서 승인해준다. 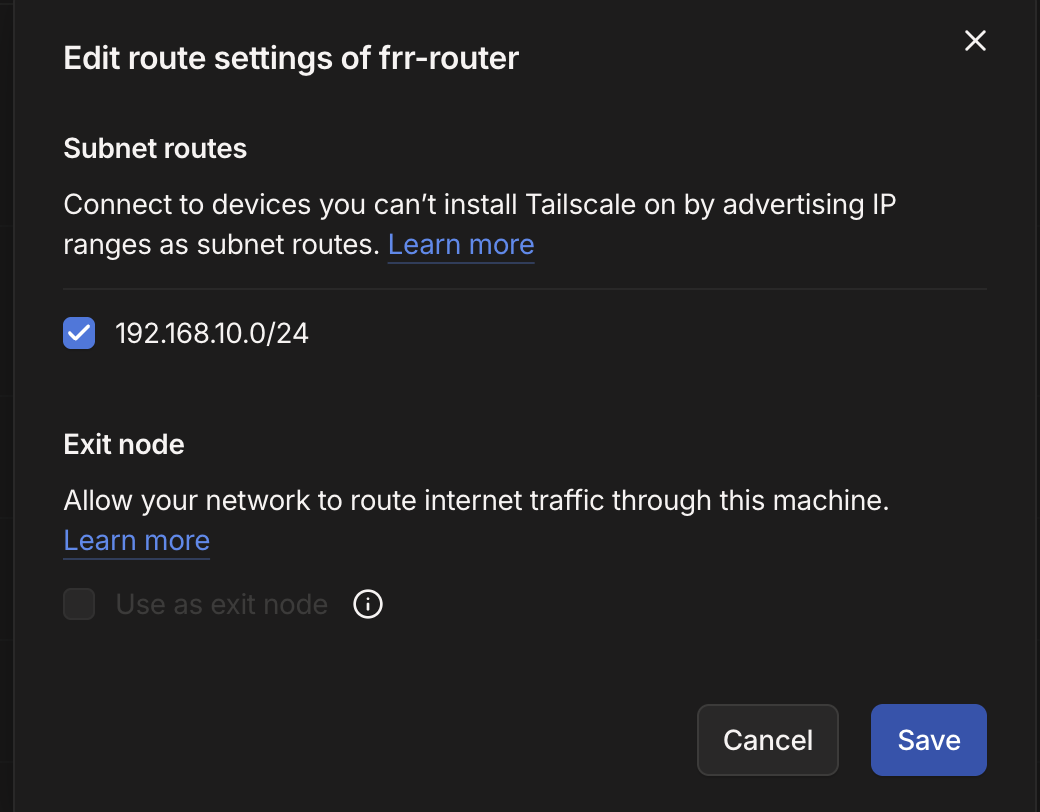
확인
이제, 우리는 내부 네트워크 노드에 모두 접근 가능하다!
Ping을 해봐도 된다.
SSH를 이용한 접속
아래와 같은 ssh config를 작성해두면 편하다.
 1
 2
 3
 4
 5
 6
 7
 8
 9
10
11
12
13
14
15
16
17
18
19
|
Host bastion
    User ubuntu
    Hostname 192.168.0.8
    IdentityFile ~/.ssh/id_rsa

Host cp-1
    User ubuntu
    Hostname 192.168.10.10
    IdentityFile ~/.ssh/id_rsa

Host worker-1
    User ubuntu
    Hostname 192.168.10.100
    IdentityFile ~/.ssh/id_rsa

Host worker-2
    User ubuntu
    Hostname 192.168.10.101
    IdentityFile ~/.ssh/id_rsa
|
이후, 각각 SSH로 접속해보자.
1
2
3
4
5
6
7
|
ssh bastion
# Ctrl + D 또는 exit으로 나온 뒤
ssh cp-1
# Ctrl + D 또는 exit으로 나온 뒤
ssh worker-1
# Ctrl + D 또는 exit으로 나온 뒤
ssh worker-2
|
만약, 이전에 같은 호스트 및 정보로 vm을 사용하다가 삭제 후 재생성 등으로 인해서,
~/.ssh/known_hosts의 정보가 충돌하는 경우가 있는데, 이 경우
~/.ssh/known_hosts의 해당 호스트 정보를 제거하고 다시 접속을 시도해보면 된다.
☸️ 쿠버네티스 설치
이전에 만들어준 Ansible을 활용한 Kubernetes의 요소들을 설치하는 플레이북이 있다. 이를 이용하자.
아래 링크에서 설치에 대해 도움받을 수 있을 것이다.
자세한 내용은 이 게시글에서 확인가능하다.
ansible.cfg와 inventory.ini는 아래를 참고하는 것이 편하다.
ansible.cfg 예시
 1
 2
 3
 4
 5
 6
 7
 8
 9
10
|
[defaults]
inventory = ./inventory.ini
remote_user = ubuntu
ask_pass = false

[privilege_escalation]
become = true
become_method = sudo
become_user = root
become_ask_pass = false
|
inventory.ini 예시
 1
 2
 3
 4
 5
 6
 7
 8
 9
10
|
[masters]
cp-1 ansible_host=cp-1 ansible_port=22

[workers]
worker-1 ansible_host=worker-1 ansible_port=22
worker-2 ansible_host=worker-2 ansible_port=22

[k8s_nodes:children]
masters
workers
|
설치 확인
설치 이후, 노드들이 모두 READY인지 확인해보자.
1
2
3
4
5
|
root@cp-1:~# kubectl get no
NAME       STATUS   ROLES           AGE   VERSION
cp-1       Ready    control-plane   16m   v1.35.0
worker-1   Ready    <none>          11m   v1.35.0
worker-2   Ready    <none>          10m   v1.35.0
|
🪪 자격 증명 가져오기
우선, Control Plane에서 ubuntu유저의 것으로 가져오자.
1
2
3
4
|
# cp-1에서
mkdir -p ~/.kube
sudo cp /etc/kubernetes/admin.conf ~/.kube/config
sudo chown $(id -u):$(id -g) ~/.kube/config
|
이후, 작업할 컴퓨터에서 scp로 가져온 뒤, 기존의 kubeconfig와 병합한다.
1
2
3
4
5
6
7
|
# 내 컴퓨터에서
scp ubuntu@cp-1:~/.kube/config ~/.kube/config.homelab

# 클러스터명, 계정명, 컨텍스트명을 수정. 기존것들과 다르게 unique해야 함
vim ~/.kube/config.homelab

KUBECONFIG=~/.kube/config:~/.kube/config.homelab kubectl config view --merge --flatten > ~/.kube/config
|
이제, 마음껏 kubectl을 써주면 된다!
다음은 Cilium BGP Peering을 위한 FRR 셋업과 Ceph스토리지 생성 등을 알아볼
것이다.