Featured image of post Cilium - BGP Peering

Cilium - BGP Peering

BGP Peering을 통해 라우터에 Cilium의 IP를 공유해보자.

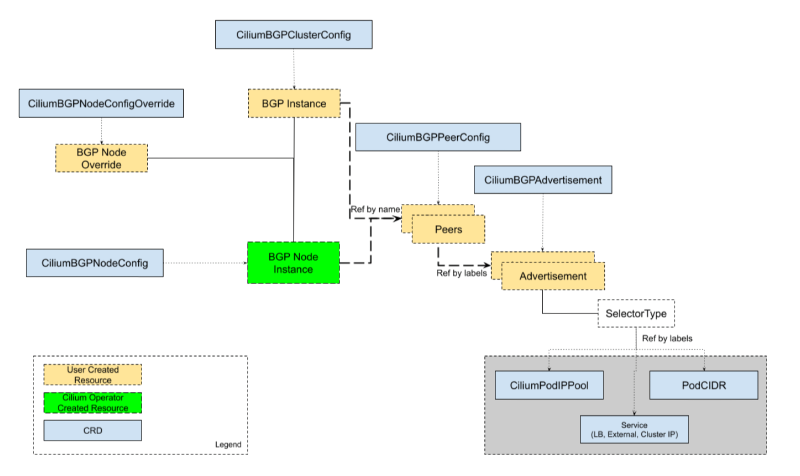
🧱 BGP Control Plane Resources

Cilium의 BGP Control Plane은 BGP Peer, Policy, advertisement 구성을 제공하는 유연한 커스텀 리소스들로부터 제공된다.

BGP Control Plane을 관리하기 위해, 다음의 자원들이 사용된다:

  • CiliumBGPClusterConfig: BGP 인스턴스와 피어링 구성을 정의한다. 여러 노드들에 적용된다.
  • CiliumBGPPeerConfig: BGP Peering의 일반적인 설정 셋으로, 여러 peer들간에 사용될 수 있다.
  • CiliumBGPAdvertisement: BGP Routing table에 주입되는 prefix들을 정의한다.
  • CiliumBGPNodeConfigOverride: node-specific한 BGP구성을 정의하여 더 나은 제어를 제공한다.

아래의 다이어그램으로 보여질 수 있다:

bgp-control-plane


📜 BGP 클러스터 구성

CiliumBGPClusterConfignodeSelector필드에 있는 1개 이상의 노드에 대한 BGP설정을 하는 곳이다.
각각의 CiliumBGPClusterConfig은 1개 이상의 BGP 인스턴스를 정의하며, 그들의 name필드에 대해 식별된다.

BGP 인스턴스는 1개 이상의 Peer를 가질 수 있다.
각 Peer는 name필드에 의해 식별된다.
Peer AS는 peerASNpeerAddress필드에 의해 정의된다.

Peer의 구성 설정은 peerConfigRef필드로 참조할 수 있다.
peerConfigRefGroupkind는 옵셔널하며, 기본적으로 cilium.ioCiliumBGPPeerConfig이다.

기본적으로, BGP 컨트롤 플레인은 리스닝 포트 없이 동작한다.
설정된 Peering만 가능하다는 의미이며, 들어오는 Peering을 받을 수 없다는 뜻이다.

이게 기본인데, 그 이유는 같은 노드에서 BGP라우터가 동작할 수 있음을 고려했기 때문이다.
들어오는 커넥션을 받으려면, localPort필드로 리스닝 포트를 정할 수 있다.

NOTE
기본 BGP Port(179)를 쓸 때에는, CAP_NET_BIND_SERVICE가 필요하다.
만약 기본 포트를 쓰고싶다면, securityContext.capabilities.ciliumAgent에서 CAP_NET_BIND_SERVICE를 helm value로 넣어줘야 한다.

아래는 CiliumBGPClusterConfig의 예시이며, instance-65000이 두 개의 peer와 피어링한 것이다.

 1
 2
 3
 4
 5
 6
 7
 8
 9
10
11
12
13
14
15
16
17
18
19
20
21
22
23
apiVersion: cilium.io/v2
kind: CiliumBGPClusterConfig
metadata:
  name: cilium-bgp
spec:
  nodeSelector:
    matchLabels:
      rack: rack0
  bgpInstances:
  - name: "instance-65000"
    localASN: 65000
    localPort: 179
    peers:
    - name: "peer-65000-tor1"
      peerASN: 65000
      peerAddress: fd00:10:0:0::1
      peerConfigRef:
        name: "cilium-peer"
    - name: "peer-65000-tor2"
      peerASN: 65000
      peerAddress: fd00:11:0:0::1
      peerConfigRef:
        name: "cilium-peer"

Auto-Discovery

Cilium BGP Control Plane은 BGP Peer에 대한 자동 디스커버리 역시 지원한다.
mode에서 특정 특정 IP주소를 정할 수 있다.

DefaultGateway모드도 있다.
기본 게이트웨이를 이용하면, 자동으로 기본 게이트웨이와 BGP를 맺으려 한다.

아래와 같이 할 수 있다:

1
2
3
4
5
6
7
8
9
peers:
- name: "tor-switch"
  peerASN: 65000
  autoDiscovery:
  mode: "DefaultGateway"
    defaultGateway:
      addressFamily: ipv6 # ipv4, ipv4중에 가능
  peerConfigRef:
    name: "cilium-peer"

ToR switch의 BGP 구성에는 다음 설정을 해줘야 한다:

1
2
3
4
router bgp 65100
  neighbor CILIUM peer-group
  neighbor CILIUM local-as 65000 no-prepend replace-as
  bgp listen range fd00:10:0:1::/64 peer-group CILIUM

설정이 적용되면, Cilium은 특정 Address Family의 기본게이트웨이를 식별하여 자동으로 BGP 세션을 맺는다.
peerConfigRef 세션 파라미터를 참조하여 피어링을 맺는다.

default gateway설정 + multi-homing(두 개 이상의 BGP와 연결)일때는 같은 address family에 대해서 동시에 여러 BGP세션을 맺을 수 없다.
대신, 우선순위가 더 높은 (metric이 더 낮은)경로를 하나 선택하여 BGP 세션을 맺는다.

Cilium은 BGP 세션을 address family당 하나만 맺을 수 있다.
대신, failover로 연결가능한데, 처음에 아래와 같은 상황이라고 가정했을 때,

1
2
default via ToR A, metric 100 
default via ToR B, metric 200

ToR A가 장애가 난다면, ToR B와 새로 BGP 세션을 맺는다.

아래 예시에서는, IP를 직접 명시하지 않았지만 기본 게이트웨이에서 가장 우선순위가 높은 하나를 고른다고 보면 된다.

 1
 2
 3
 4
 5
 6
 7
 8
 9
10
11
12
bgpInstances:
- name: "65001"
  localASN: 65001
  peers:
  - name: "instance-65001"
    peerASN: 65000
    autoDiscovery:
      mode: "DefaultGateway"
      defaultGateway:
        addressFamily: ipv6
    peerConfigRef:
      name: "cilium-peer"

대신, 같은 address family에서 여러 peer와 세션을 맺고 싶다면, 직접 두 peer를 명시해야 한다.


🛠️ BGP Peer Configuration

CiliumBGPPeerConfig 자원은 BGP Peer 연결설정을 정의할 때 사용한다.
여러 Peer와의 연결에서 같은 Configuration을 공유해서 사용할 수 있다.

여러 옵션을 가질 수 있다:

  • MD5 Password
  • Timers
  • EBGP Multihop
  • Graceful Restart
  • Transport
  • Address Families

아래는 예시이다:

 1
 2
 3
 4
 5
 6
 7
 8
 9
10
11
12
13
14
15
16
17
18
19
apiVersion: cilium.io/v2
kind: CiliumBGPPeerConfig
metadata:
  name: cilium-peer
spec:
  timers:
    holdTimeSeconds: 9
    keepAliveTimeSeconds: 3
  authSecretRef: bgp-auth-secret
  ebgpMultihop: 4
  gracefulRestart:
    enabled: true
    restartTimeSeconds: 15
  families:
    - afi: ipv4
      safi: unicast
      advertisements:
        matchLabels:
          advertise: "bgp"

MD5 Password

AuthSecretRefRFC-2385의 TCP MD5 Password를 BGP Peering에 쓸 수 있다.

아래는 예시이다.

1
2
3
4
5
6
apiVersion: cilium.io/v2
kind: CiliumBGPPeerConfig
metadata:
  name: cilium-peer
spec:
  authSecretRef: bgp-auth-secret

AuthSecretRef는 BGP secrets namespace에 써야 한다.
(helm-chart 기본값은 kube-system)
password라는 키를 가져야 한다.
BGP 시크릿은 각 Cilium Agent 인스턴스가 최소로 쓸 수 있는 권한으로 제한되어있다.

만약 namespace를 바꾸고싶다면, helm chart의 bgpControlPlane.secretNamespace.name의 값을 바꾸면 된다.
생성도 자동으로 하고싶으면, bgpControlPlane.secretNamespace.createtrue로 해주면 된다.

패스워드가 틀리다면, dial: i/o timeout으로만 뜬다.
만약 authSecretRef의 시크릿을 찾을 수 없으면, BGP시션은 빈 패스워드를 쓰고, 아래와 같은 오류를 낸다:

1
level=error msg="Failed to fetch secret \"secretname\": not found (will continue with empty password)" component=manager.fetchPeerPassword subsys=bgp-control-plane

Timers

BGP Control Plane은 BGP timer 파라미터를 수정하는 것을 지원한다.

Name Field Default
ConnectRetryTimer connectRetryTimeSeconds 120
HoldTimer holdTimeSeconds 90
KeepaliveTimer keepAliveTimeSeconds 30

장애 감지를 더 빠르게 하기 위해서는, HoldTimerKeepaliceTimer를 더 짧은 주기로 설정하는것을 권장한다.
최소수치인 holdTmeSeconds=9keepAliveTimeSeconds=3과 같은 식으로 할 수 있다.

Peer와 연결이 끊기고 빠르게 회복하려면, connectRetryTimeSeconds를 줄이면 된다.
내부적으로 랜덤 jitter가 적용되는데, [ConnectRetryTimeSeconds, 2 * CoonnectRetryTimeSeconds)이다.

1
2
3
4
5
6
7
8
9
apiVersion: cilium.io/v2
kind: CiliumBGPPeerConfig
metadata:
  name: cilium-peer
spec:
  timers:
    connectRetryTimeSeconds: 5
    holdTimeSeconds: 9
    keepAliveTimeSeconds: 3

EBGP Multihop

기본적으로 BGP 패킷의 IP TTL은 1인데, Multihop 설정을 위해서는, spec.ebgpMultihop을 1보다 크게 해주면 된다.

Graceful Restart

Graceful Restart 를 켜면, Cilium Agent가 재시작하는것과 같이 BGP 프로세스가 잠깐 내려가도, 실제 커널은 살아있어서 패킷 포워딩은 가능한 경우가 있다.

이때 route를 지우면 트래픽 중단이 불필요하게 생기니, 금방 다시 올라올 수 있다고 알려주는 capacity가 graceful restart이다.

  1. Cilium이 BGP OPEN 메시지에서 graceful restart capacity를 광고
  2. Peer는 재시작중에도 경로유지를 할 것을 약속
  3. Cilium Agent가 재시작되는 동안, BGP 세션이 끊기는데,
    Peer는 route를 RestartTime동안 유지
  4. Cilium은 다시 BGP를 복구하면, 트래픽 중단없이 계속 이어짐
  5. 시간이 초과되면, 실제로 죽었다고 판단하고 route삭제

상대 라우터는 TCP FIN플래그 메시지를 받고, RestartTime 타이머를 시작한다.

1
2
3
4
5
6
7
8
apiVersion: cilium.io/v2
kind: CiliumBGPPeerConfig
metadata:
  name: cilium-peer
spec:
  gracefulRestart:
    enabled: true
    restartTimeSeconds: 15

RestartTime의 기본값은 120초이다.

Transport

transport는 TCP연결의 세부사항을 만진다. 기본 설정과 다르게 TCP연결을 설정할 때 사용한다.

1
2
3
4
spec:
  transport:
    peerPort: 179
    sourceInterface: lo

Address Families

families필드에는 AFI(Address Family Identifier) , SAFI(Subsequent Address Family Identifier) 의 리스트가 있다.

기본적으로, address family가 없다면, BGP Control Plane은 IPv4 Unicast와 IPv6 Unicast를 멀티프로토콜 확장 capability로 광고한다.

각 Address family에서는, advertisements label selector를 통해 라우트 광고를 제어할 수 있다.
CiliumBGPAdvertisement를 골라야 한다.

NOTE 매칭이 없으면, 아무 prefix도 광고될 수 없다.

 1
 2
 3
 4
 5
 6
 7
 8
 9
10
11
12
13
14
15
16
apiVersion: cilium.io/v2
kind: CiliumBGPPeerConfig
metadata:
  name: cilium-peer
spec:
  families:
    - afi: ipv4
      safi: unicast
      advertisements:
        matchLabels:
          advertise: "bgp"
    - afi: ipv6
      safi: unicast
      advertisements:
        matchLabels:
          advertise: "bgp"

📢 BGP Advertisements

CiliumBGPAdvertisement자원은 다양한 광고 타입을 정할 수 있다.
advertisements label의 매칭은 Peer Configuration의 familes와 연관있다.

BGP Attributes

BGP path attributes를 advertisements[*]에 정의할 수 있다.

두 가지의 속성이 있는데, CommunitiesLocalPreference이다.

  • Communities: BGP의 라우트 태그같은 개념이라고 보면 된다.
    • standard:으로 32비트 숫자를 나누며, 16비트:16비트숫자를 쓰는 형식이다.
    • wellknownstandard와 같은 형식을 가지지만, well-known값에 대한 alias를 가진다.
      • ex. internet은 0:0, no-advertise는 “65535:65282”
    • large는 3개의 4바이트정수가 콜론으로 나뉘어진다.
      • ex. 64512:100:50
  • Local Preference: iBGP에서의 내부 우선순위 값이며, eBGP peer에게는 무시될것이다.
 1
 2
 3
 4
 5
 6
 7
 8
 9
10
11
12
13
apiVersion: cilium.io/v2
kind: CiliumBGPAdvertisement
metadata:
  name: bgp-advertisements
  labels:
    advertise: bgp
spec:
  advertisements:
    - advertisementType: "PodCIDR"
      attributes:
        communities:
          standard: [ "65000:99" ] # Route에 65000:99 태그를 붙임
        localPreference: 99 # iBGP내부 선호값(값이 클수록 더 선호)

Cilium은 세 가지의 광고를 제공한다:

  • Pod CIDR range
  • Service VIPs
  • Interface IPs

Pod CIDR Ranges

노드의 Pod CIDR prefix를 광고할 수 있다.
BGP Peer가 로드밸런서 또는 NAT없이 접속할 수 있다.

IPAM모드 세팅별로 두 가지 방법이 있다.

Kubernetes나 ClusterPool IPAM인 경우, advertisement의 type을 PodCIDR로 하면 된다.

1
2
3
4
5
6
7
8
9
apiVersion: cilium.io/v2
kind: CiliumBGPAdvertisement
metadata:
  name: bgp-advertisements
  labels:
    advertise: bgp
spec:
  advertisements:
    - advertisementType: "PodCIDR"

이 구성으로, BGP 인스턴스는 로컬 노드의 Pod CIDR prefix를 광고할 수 있다.

MultiPool IPAM에서는 advertisementTypeCiliumIPPool로 해야 한다.
selector필드의 .matchLabels 또는 matchExpressions로 매칭할 수 있다.

 1
 2
 3
 4
 5
 6
 7
 8
 9
10
11
12
13
14
15
16
17
18
19
apiVersion: cilium.io/v2
kind: CiliumPodIPPool
metadata:
  name: default
  labels:
    pool: blue
---
apiVersion: cilium.io/v2
kind: CiliumBGPAdvertisement
metadata:
  name: pod-ip-pool-advert
  labels:
    advertise: bgp
spec:
  advertisements:
    - advertisementType: "CiliumPodIPPool"
      selector:
        matchLabels:
          pool: "blue"

이 설정에서는 선택된 Cilium Pod IP Pool에 할당된 PodCIDR prefix가 광고된다.
이 예시에서, CiliumNode 리소스에 CIDR이 반드시 할당되어야 한다.

모든 CiliumPodIPPool CIDR를 클러스터 안에 광고하고 싶다면, NotIn으로 dummy key-value를 이용하여 쓸 수 있다.

 1
 2
 3
 4
 5
 6
 7
 8
 9
10
11
12
apiVersion: cilium.io/v2
kind: CiliumBGPAdvertisement
metadata:
  name: pod-ip-pool-advert
  labels:
    advertise: bgp
spec:
  advertisements:
    - advertisementType: "CiliumPodIPPool"
      selector:
        matchExpressions:
        - {key: somekey, operator: NotIn, values: ['never-used-value']}

name이나 namespace를 기반으로 고르고 싶은 때가 있는데, 특별한 키를 제공한다.

  • io.cilium.podippool.name -> meta.name
  • io.cilium.podippool.namespace -> meta.namespace
1
2
3
4
5
6
selector:
  matchExpressions:
    - key: io.cilium.podippool.namespace
      operator: In
      values:
        - kube-system

다른 IPAM Type은 BGP prefix 광고가 지원하지 않는다.

Service Virtual IPs

Service는 여러 virtual IP를 가질 수 있다.
Service의 virtual IP를 BGP Peer로 광고할 수 있다.

NOTE Cilium의 BGP Control Plane은 VIP를 /32또는 /128 prefix로 광고한다.

service의 virtual IP를 광고하기 위해, advertisementType의 필드를 Service로 하고,
service.addresses 필드에 LoadBalancerIP, ClusterIP, 또는 ExternalIP로 해준다.

.selector에서 .matchLabels또는 matchExpressions로 가능하다.

 1
 2
 3
 4
 5
 6
 7
 8
 9
10
11
12
13
14
15
16
17
apiVersion: cilium.io/v2
kind: CiliumBGPAdvertisement
metadata:
  name: bgp-advertisements
  labels:
    advertise: bgp
spec:
  advertisements:
    - advertisementType: "Service"
      service:
        addresses:
          - ClusterIP # ClusterIP
          - ExternalIP # ExternalIP
          - LoadBalancerIP # LoadBalancerIP
      selector:
        matchExpressions:
          - { key: bgp, operator: In, values: [ blue ] }

업스트림 라우터가 **ECMP(Equal Cost Multi Path)**를 지원한다면, 같은 VIP에 대해서 실제로 로드밸런싱이 일어날 것이다.

NOTE 많은 라우터들이 라우팅 테이블에 저장하는 ECMP 경로에 대해 한계를 가지는데, 많은 노드들로부터 Service VIP가 광고된다면, 한계를 넘을 수 있다. 이 기능을 쓰려면, 네트워크 관리자로부터 한계를 알아내는 것이 좋을 것이다.

각 주소 타입별로 특징이 있다:

  • ClusterIP
    • 클러스터 내부 전용.
    • kubeProxyReplacement와 함께 쓰려면, 여기를 참고
  • ExternalIP
    • 관리자가 직접 지정하는 외부 노출용 IP
    • kubeProxyReplacement와 함께 쓰려면, ExternalIP 지원이 켜져야 한다.
  • LoadBalancerIP
    • Kubernetes에서는 이 IP를 자동할당하지 않는다.
    • 그래서, 별도 할당 주체가 필요하다.
    • Cilium은 LoadBalancer IPAM을 이용할 수 있다. 특별한 metadata들 역시 제공된다:
  • io.kubernetes.service.namespace -> .meta.namespace
  • io.kubernetes.service.name -> .meta.name

service가 LoadBalancer 타입일때, loadBalancerClass=io.cilium/bgp-control-plane이거나 비어있다면, Cilium이 광고할 수 있다.
또는, 미설정인 경우 광고할 수 있다.

대신, 다른 class를 지정하면, Cilium은 광고할 수 없다.

NOTE externalTrafficPolicyCluster인경우, 조건 없이 광고하지만, Local인 경우, 해당 endpoint가 없으면 광고하지 않는다.

하나의 Service가 여러 advertisement selector에 동시에 걸릴 수 있는데, 이 경우 community는 합쳐지며(union), local-pref는 가장 큰 값 하나(max)를 쓴다.

기본적으로 service는 단일 IP(/32, /128)을 광고하지만, aggregation이 지원되기도 한다.
아래와 같이 더 큰 대역단위로 광고할 수 있다.

1
2
3
service:
  aggregationLengthIPv4: 24
  aggregationLengthIPv6: 120

이렇게 하면, 라우팅 테이블을 적게 차지하며, 광고 수를 줄일 수 있다.

그러나, 실제 service에 없는 트래픽도 클러스터로 들어올 수 있음을 유의해야 하며,
또한 externalTrafficPolicy=Local인 경우, aggregation될 수 없다.

Interface IP

Service가 아니라, 노드 인터페이스에 붙은 IP자체를 광고할 수도 있다.
멀티호밍에 유용하게 쓰일 수 있다.
정확한 주소(/32, /128)로 광고되며, 다음의 주소는 광고되지 않는다:

  • loopback
  • multicast
  • IPv6 link-local
  • IPv4-mapped IPv6

인터페이스는 up이나 unknown상태여야 한다.

 1
 2
 3
 4
 5
 6
 7
 8
 9
10
11
apiVersion: cilium.io/v2
kind: CiliumBGPAdvertisement
metadata:
  name: bgp-advertisements
  labels:
    advertise: bgp
spec:
  advertisements:
    - advertisementType: "Interface"
      interface:
        name: lo

(여기서의 lo는 논리적 인터페이스로, 127.0.0.1이 아닌 다른 주소를 붙인 것이다.)


📝 BGP Configurations Override

현재는 이 글에서 다루지 않음, 대신 여기서 확인


🏋️ Hands-On

helm values에 다음과 같이 추가한 뒤, 업데이트한다:

1
2
3
# bgpControlPlane
bgpControlPlane:
  enabled: true

LoadBalancer IP 광고

다음의 네트워크 토폴로지를 가정한다:

topology

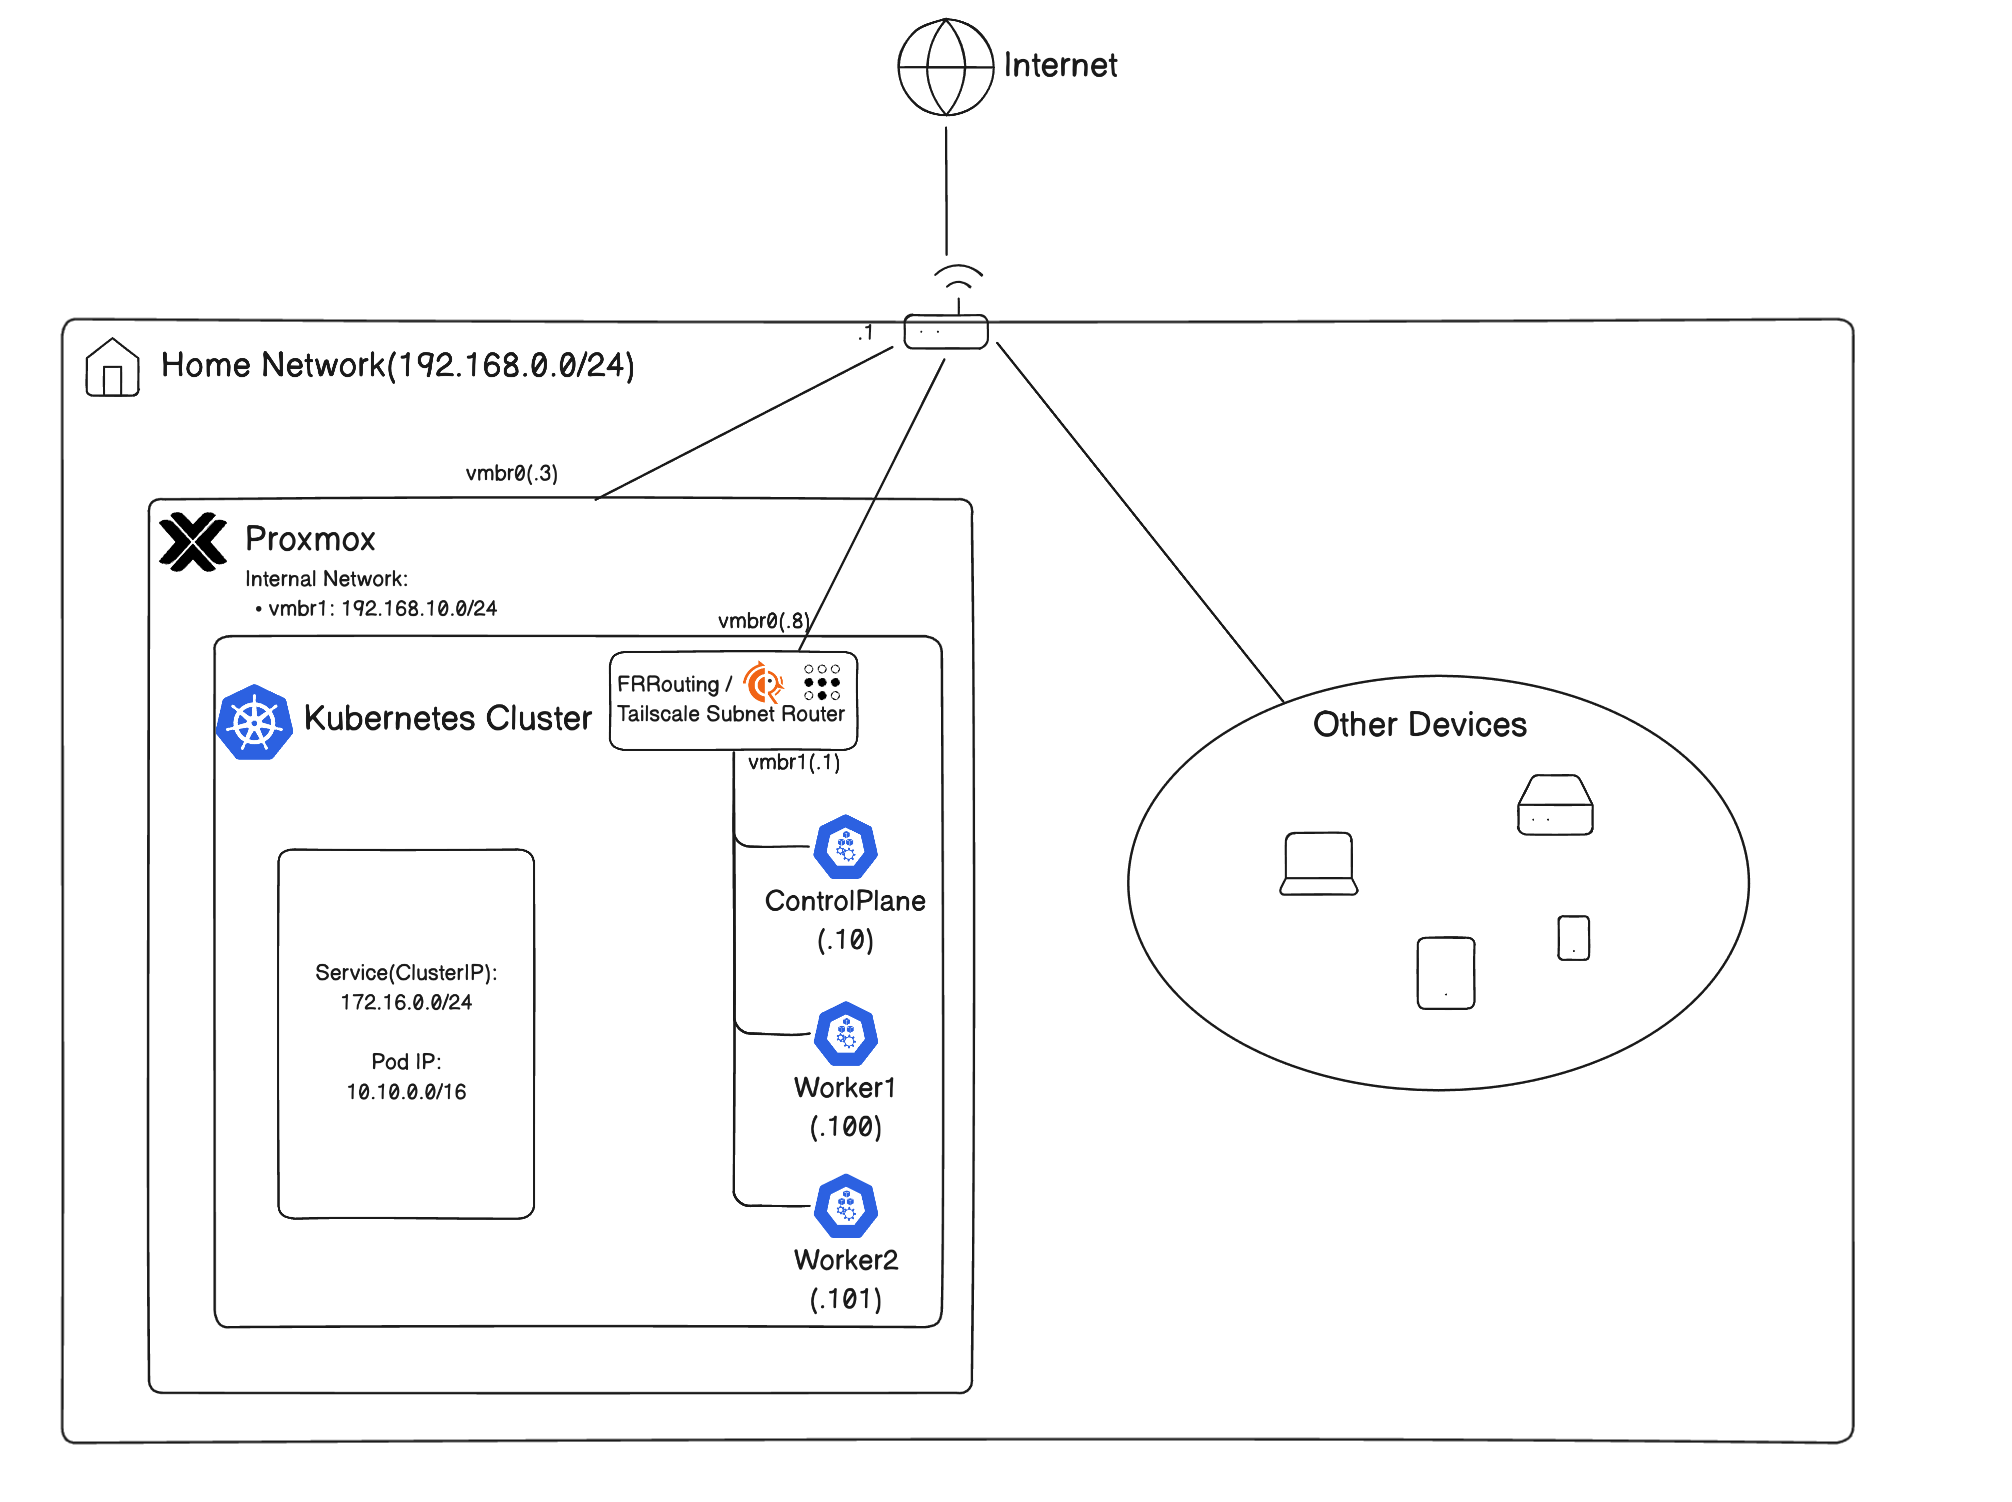
쿠버네티스 노드들의 기본 게이트웨이가 FRRouter로 설정되어있다.
FRRouter의 설정(/etc/frr/frr.conf)은 다음과 같다:

 1
 2
 3
 4
 5
 6
 7
 8
 9
10
11
12
13
14
15
16
17
18
19
20
21
22
23
24
25
26
27
28
29
30
31
32
33
34
35
36
frr version 10.5.1
frr defaults traditional
hostname frr-router
log syslog informational
service integrated-vtysh-config
!
# 라우트맵 정의: 모든 경로 허용
route-map ALLOW-ALL permit 10
exit
!
# BGP 라우터 설정 (ASN 65000)
router bgp 65000
 # BGP 라우터 ID 설정
 bgp router-id 192.168.10.1
 # K8S-NODES라는 peer-group 생성
 neighbor K8S-NODES peer-group
 # K8S-NODES peer-group의 remote ASN을 65001로 설정
 neighbor K8S-NODES remote-as 65001
 # capability를 동적으로 협상 가능하게 하도록 설정(새로운 세션 없이)
 neighbor K8S-NODES capability dynamic
 # 192.168.10.0/24 대역의 노드들이 동적으로 BGP피어링이 가능하도록 설정
 bgp listen range 192.168.10.0/24 peer-group K8S-NODES
 !
 # IPv4 유니캐스트 Address family 설정
 address-family ipv4 unicast
  # K8S-NODES그룹에게 Next-hop을 자신으로 변경
  neighbor K8S-NODES next-hop-self
  # K8s-NODES그룹에서 받는 경로에 ALLOW_ALL 라우트맵 적용
  neighbor K8S-NODES route-map ALLOW-ALL in
  # K8s-NODES그룹으로 보내는 경로에 ALLOW_ALL 라우트맵 적용
  neighbor K8S-NODES route-map ALLOW-ALL out
  # ECMP(Equal-Cost Multi-Path) 설정 - 최대 경로 수를 64개 설정
  maximum-paths 64
 exit-address-family
exit
!

CiliumBGPClusterConfig

우선, CiliumBGPClusterConfig를 설정한다.
이 설정은 모든 노드에 적용된다.

 1
 2
 3
 4
 5
 6
 7
 8
 9
10
11
12
13
14
15
16
17
18
apiVersion: cilium.io/v2
kind: CiliumBGPClusterConfig
metadata:
  name: cilium-bgp
spec:
  nodeSelector:
    matchLabels:
      kubernetes.io/os: linux
  bgpInstances:
  - name: "K8S-NODES"
    localASN: 65001
    localPort: 179
    peers:
    - name: "FRRouter" # frr 라우터
      peerASN: 65000 # frr AS
      peerAddress: 192.168.10.1 # frr IP
      peerConfigRef:
        name: "cilium-peer" # cilium-peer라는 CiliumBGPPeerConfig를 참조

localPort를 BGP의 기본 포트인 179번 well-known포트로 받기 위해서는, helm values에서 다음과 같이 설정되어야 한다:

1
2
3
4
5
6
# Listening on the default BGP Port
securityContext:
  privileged: true
  capabilities:
    ciliumAgent:
      - CAP_NET_BIND_SERVICE

CiliumBGPPeerConfig

cilium-peer라는 CiliumBGPPeerConfig를 설정한다.

 1
 2
 3
 4
 5
 6
 7
 8
 9
10
11
12
13
14
15
16
17
apiVersion: cilium.io/v2
kind: CiliumBGPPeerConfig
metadata:
  name: cilium-peer
spec:
  timers:
    holdTimeSeconds: 90
    keepAliveTimeSeconds: 30
  gracefulRestart:
    enabled: true
    restartTimeSeconds: 120
  families:
    - afi: ipv4
      safi: unicast
      advertisements:
        matchLabels:
          advertise: "bgp" #CiliumBGPPeerConfig의 advertisements의 matchLabels와 일치 

CiliumBGPAdvertisement

 1
 2
 3
 4
 5
 6
 7
 8
 9
10
11
12
13
14
15
16
apiVersion: cilium.io/v2
kind: CiliumBGPAdvertisement
metadata:
  name: advertise-gateway-lb
  labels:
    advertise: bgp #CiliumBGPPeerConfig의 advertisements의 matchLabels와 일치
    bgp-advertisement: "true"
spec:
  advertisements:
  - advertisementType: Service # Service 광고
    selector:
      matchLabels:
        app: http-test # app: http-test 라벨을 가진 Service 광고
    service:
      addresses:
      - LoadBalancerIP # LoadBalancer IP 광고

간단한 HTTP 앱 노출

 1
 2
 3
 4
 5
 6
 7
 8
 9
10
11
12
13
14
15
16
17
18
19
20
21
22
23
24
25
26
27
28
29
30
31
32
33
34
35
36
37
# http-test.yaml
apiVersion: apps/v1
kind: Deployment
metadata:
  name: http-test
  labels:
    app: http-test 
spec:
  replicas: 1
  selector:
    matchLabels:
      app: http-test
  template:
    metadata:
      labels:
        app: http-test
    spec:
      containers:
        - name: http-server
          image: riveroverflow/cilium-test-http:latest
          ports:
            - containerPort: 8080
---
apiVersion: v1
kind: Service
metadata:
  name: http-test
  labels:
    app: http-test # CiliumBGPAdvertisement의 selector와 일치
spec:
  selector:
    app: http-test
  ports:
    - protocol: TCP
      port: 80
      targetPort: 8080
  type: LoadBalancer

이제, kubectl apply -f http-test.yaml로 적용하면 된다.

단, CiliumLoadBalancerIPPool이 설정되어있어야 한다. 아래와 같이 설정할 수 있다:

1
2
3
4
5
6
7
8
apiVersion: cilium.io/v2
kind: CiliumLoadBalancerIPPool
metadata:
  name: public-pool
spec:
  blocks:
  - cidr: 172.20.0.0/24
  disabled: false

생성된 service를 확인해보자.

 1
 2
 3
 4
 5
 6
 7
 8
 9
10
11
12
13
14
cilium-playground on  main on ☁️  (ap-northeast-2) on ☁️  fudoge67@gmail.com
23:49:07  ❯ k get svc
NAME                             TYPE           CLUSTER-IP       EXTERNAL-IP   PORT(S)          AGE
...
http-test                        LoadBalancer   10.105.166.135   172.20.0.1    80:30525/TCP     5d8h
...

이제, `curl http://172.20.0.1:80`로 테스트해보면 된다.

```bash
cilium-playground on  main on ☁️  (ap-northeast-2) on ☁️  fudoge67@gmail.com
23:54:52  ❯ curl http://172.20.0.1
hello from http server
method=GET path=/ time=2026-03-12T14:54:54Z

BGP Peering 상태도 확인할 수 있다:

1
2
3
4
5
6
cilium-playground on  main on ☁️  (ap-northeast-2) on ☁️  fudoge67@gmail.com
23:54:45  ❯ cilium bgp peers
Node       Local AS   Peer AS   Peer Address   Session State   Uptime     Family         Received   Advertised
cp-1       65001      65000     192.168.10.1   established     76h5m19s   ipv4/unicast   1          1
worker-1   65001      65000     192.168.10.1   established     76h5m19s   ipv4/unicast   1          1
worker-2   65001      65000     192.168.10.1   established     76h4m51s   ipv4/unicast   1          1

📚 결론

  • Cilium BGP Control Plane을 이용하여 BGP Peering을 맺은 라우터에 클러스터 내에서 쓰이는 IP들 및 LoadBalancer IP들을 광고할 수 있다.
  • L2광고대신 실드가 LoadBalancer IP를 광고하는 “진짜 로드밸런싱"이 가능하다.
  • Pod IP에 직접 접근할 수도 있으며, 서로 다른 네트워크에서 중간에 BGP라우터가 중개하는 경우, Pod간 통신에서 이 기능이 활용될 수 있다.

📚 References

Hugo로 만듦
JimmyStack 테마 사용 중